

Course
Your first SCAYLE Add-On
Create your first Add-On
- Add-On
- Tech


Mikheil Kupatadze
Senior Frontend Developer
First, we will focus on the frontend UI part of your Add-on.
Specific app functionality can be defined using the Admin API (for access to the backend services, such as shop/product data) and the Add-on API (for access to the SCAYLE Panel session data, such as user information).
The Add-on UI is written as a micro frontend, utilizing the single-spa framework. It can be written in the JavaScript framework of your choice. However, we recommend using Vue 3. This will also allow you to utilize the Panel style component library, assuring the look and feel of your Add-on matches the rest of the SCAYLE Panel. You can find out more about the concept of micro frontends at single-spa.js.org.
Every new Add-on application is set up and configuration similar to our demo Add-on. It requires a manifest file where application data and routes are set.
Add-on Apps are:
Applications should be wrapped as a single-spa application. In other words, it is an object containing three methods:
bootstrapmountunmountbootstrap is called the first time the application is mounted while mount and unmount contain the logic for mounting and un-mounting the application.
On the initial page load, the SCAYLE Panel will request the manifest file of each active Add-on. Inside the manifest, the Add-on app will be registered with single-spa.
Single-spa then automatically loads or unloads applications on URL changes. When the URL matches /add-ons/{addOnName}/* or /shops/:id/{addOnName}/* the Add-on with that name is loaded.
Each Add-on should have a unique identifier, used as part of the URL. In case the app URL of multiple Add-ons is the same, opening one of the Add-ons results in loading all of them. This can cause undesirable behavior such as the sidebar loading multiple times.
Each Add-on app must have a manifest file. This is the file that the SCAYLE Panel fetches in order to load the application. The manifest should export a single function manifestRegistration.
export default manifestRegistration;
The manifest should be formatted in the System.register module format. With Webpack, this can be configured by setting output.library.type to be system (or set rollup's format to "system").
See Webpack documentation for more information.
When using Webpack
System.js format, it will not work properly.Here’s an example of an app manifest (from the demo Add-on), it contains the configuration for registering your Add-on into the single-spa framework and registers your Add-on routes:
// This config function does nothing but return its input
// But it does provide some helpful type hints
import { config, RouteDefinition } from '@scayle/add-on-utils';
import { AddOnRoute, routes } from './router';
import { GroupRouteDefinition } from './types';
import { ADD_ON_ID, generateGroupName } from './utils';

const applyDefaultRouteProps = (routes: RouteDefinition[]) => routes.map(route => ({...route, sidebar: route.sidebar === null ? null : ADD_ON_ID}));

const mappedRoutes = routes.map(originalRoute => {
    const route = JSON.parse(JSON.stringify(originalRoute)) as AddOnRoute;
    const children = route.children;
    const meta = route.meta as RouteDefinition;

    if(children && children.length && !meta.children) {
        meta.children = children.map(childRoute => {
            const pathArray = childRoute.path.split("/");
            const pathForManifest = pathArray[pathArray.length - 1];

            // if the path for the manifest also contains the path of the parent,
            // the active item highlighting in the sidebar does not work that's what the lines above are for

            return "/" + pathForManifest;
        });
    }

    return meta;
});

const generalRoutes: GroupRouteDefinition[] = [
    {
        id: 'general-group',
        name: {
            'en': 'General',
            'de': 'Allgemeines'
        },
        group: generateGroupName('general'),
        isGroup: true,
    },
    ...mappedRoutes
];

const manifestRegistration = config(function (registerApplication, registerRoutes) {
    registerApplication({
        name: ADD_ON_ID,
        // Make sure to use a dynamic import to create a code-split point
        // and minimize the size of the manifest since it is loaded on every page
        app: () => import('./add-on'),
    });

    registerRoutes({
        [ADD_ON_ID]: [
            ...applyDefaultRouteProps(generalRoutes as RouteDefinition[]),
        ]
    })
});

// !!!!!DO NOT CHANGE LINE BELOW
// IT IS USED FOR HOT RELOADING ON SCAYLE PANEL ADDON
// AND WILL BREAK IF THE LINE BELOW IS CHANGED
export default manifestRegistration;
For routes, the routes.ts file is the single source of truth. Import and map routes in the manifest.ts file as shown in the example below. Properties required for the manifest routes should be defined in the route meta of routes.ts.
To define the path of route children, use one of the following formats: :id OR /table-listing/:id.
Here’s an example router.ts file:
import { createRouter, createWebHistory, RouteRecordRaw } from 'vue-router';
import { GroupRouteDefinition } from './types';
import { ADD_ON_ID, BASE_URL, generateGroupName } from './utils';

// Use dynamic imports to enable code-splitting
const DashboardPage = () => import('./pages/DashboardPage.vue');
const AlertsPage = () => import('./pages/AlertsPage.vue');
const FormPage = () => import('./pages/FormPage.vue');
const TableListing = () => import('./pages/TableListing.vue');
const ComponentsPage = () => import('./pages/ComponentsPage.vue');

export type AddOnRoute = Omit<RouteRecordRaw, "meta"> & { meta: GroupRouteDefinition };

export const routes: AddOnRoute[] = [
    {
        name: 'dashboard',
        path: '/',
        component: DashboardPage,
        meta: {
            id: 'dashboard',
            name: {
                'en': 'Dashboard',
                'de': 'Dashboard'
            },
            icon: 'dashboard',
            path: BASE_URL + '/',
            sidebar: ADD_ON_ID,
            group: generateGroupName('general'),
        }
    },
    {
        path: '/table-listing',
        component: TableListing,
        children: [
            {
                name: "table-detail",
                path: ":id",
                component: TableListing
            }
        ],
        meta: {
            id: 'table-listing',
            name: {
                'en': 'Table Listing',
                'de': 'Tabellenauflistung'
            },
            icon: 'data-table',
            path: BASE_URL + '/table-listing',
            sidebar: ADD_ON_ID,
            group: generateGroupName('general'),
        }
    },
    {
        path: '/form',
        component: FormPage,
        meta: {
            id: 'form',
            name: {
                'en': 'Form',
                'de': 'Form'
            },
            icon: 'search',
            path: BASE_URL + '/form',
            group: generateGroupName('general'),
        }
    },
    {
        path: '/alerts',
        component: AlertsPage,
        meta: {
            id: 'alerts',
            name: {
                'en': 'Alerts',
                'de': 'Meldungen'
            },
            icon: 'warning',
            path: BASE_URL + '/alerts',
            group: generateGroupName('general'),
        }
    },
    {
        path: '/components',
        component: ComponentsPage,
        meta: {
            id: 'components',
            name: {
                'en': 'Components',
                'de': 'Komponenten'
            },
            icon: 'ufo',
            path: BASE_URL + '/components',
            group: generateGroupName('general'),
        }
    },
];

export default createRouter({
    routes: routes as RouteRecordRaw[],
    // Make sure to set the base because all Add-on pages will be under add-ons/demo
    history: createWebHistory(BASE_URL),
});
Each Add-on defines its own permissions. They are published to the SCAYLE Panel via the Add-on API. Permissions can then be assigned to roles, which are attached to users, using the SCAYLE Panel.
Follow our Add-on API Guide to see how you can publish permissions, from your backend application.
.png)
Permissions are defined for each Add-on and published to the SCAYLE Panel via the Add-on API.
A permission name follows a simple structure to be displayed correctly inside the role creation.
{{add-on-name}}__{{section}}__{{permission}}
For example, you may want to have your own section within the permissions that is called “Posts”, and within this is the permission “Update”. The full permission name could look as follows: your-add-on-identifier__posts__update.
Read more about the translation of permissions below.
Once the user is logged into the SCAYLE Panel, all registered Add-ons will have access to the current user’s Authorization Token (available under window.Scayle.Panel.Config.auth.token
e.g.: 3|yUt2******************RyQ9)
That Authorization Token can then be used by your Add-on backend application, to authorize the user against the Add-on API.
Read more about the Add-on API Get User endpoint.
The goal is, to initiate your own auth token for all communication between your Add-on frontend and backend. To achieve that, your Add-on frontend sends the SCAYLE Panel Authorization Token to your Add-on backend. To confirm the authenticity of that provided SCAYLE Panel Authorization Token, your Add-on backend validates the Token against the SCAYLE Add-on API, and receives confirmation whether the Token is valid or not. The SCAYLE Add-on API response also includes up-to-date information about the users' permissions.
We recommend a dedicated backend route for this initial authentication process (e.g., /api/v1/external/add-ons/user).
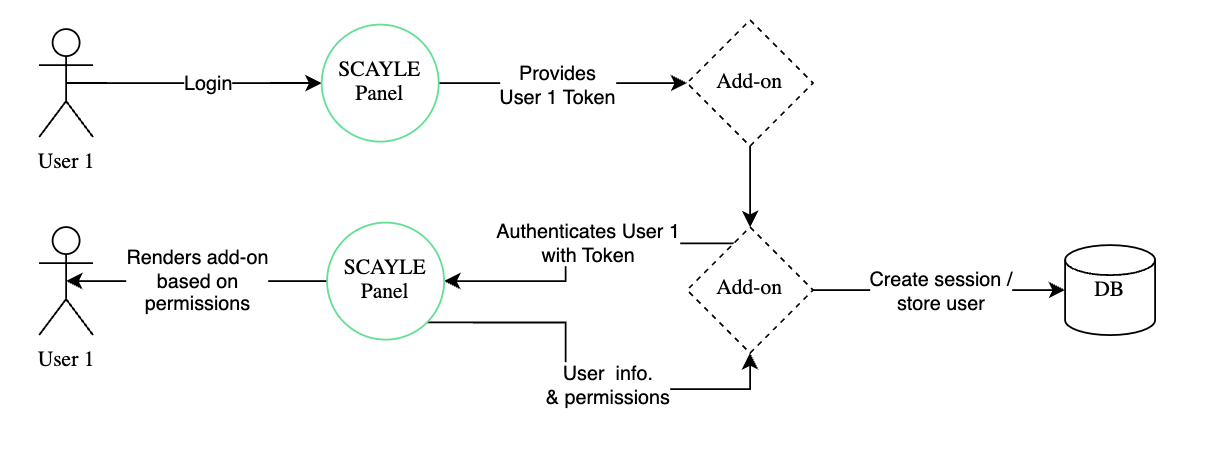
Token-based authentication between the SCAYLE Panel and Add-on.
The Add-on API response only returns the information that belongs to the requesting Add-on. For example, User Custom Data only returns the permissions and custom data that was added through the Add-on. All other information is based on the SCAYLE Panel user.
{
   "id":1,
   "name":"John Doe",
   "email":"john.doe@scayle.test",
   "locale":"de_DE",
   "timezone":"Europe/Berlin",
   "phoneNumber":"12345678",
   "companies":[
      1,
      2
   ],
   "allowedShopCountries":[
      100,
      200
   ],
   "allowedShops":[
      1,
      2
   ],
   "allowedMerchants":[
      1,
      2
   ],
   "permissions":[
      "create",
      "delete"
   ],
   "customData":{
      "alias":"Max",
      "color":"red"
   },
   "roles":[
      "developer",
      "administrator"
   ],
   "createdAt":"2023-01-01T00:00:00.000000Z",
   "updatedAt":"2023-01-02T05:00:00.000000Z"
}
The Add-on API translations endpoint allows developers to easily create and modify translations for Add-ons. Translations can be applied to the Add-on permissions, title, and descriptions. You cannot, for example, apply a button's translation.
Translations are divided into two types:
add-on-dev-guide__dashboard__view). Those translations can be seen in the Settings/Roles section where the permissions are configuredtitle or descriptionadd-on-dev-guide__dashboard__view). Those translations can be seen in the Settings/Roles section where the permissions are configuredtitle or description{
"translations":{
"title":{
"de_DE":"Developer Guide Test",
"en_GB":"Developer Guide Test"
},
"description":{
"de_DE":"Developer Guide Test",
"en_GB":"Developer Guide Test"
}
}
}
For System translations, we first need to set up some permissions.
{
  "permissions":[
    "add-on-dev-guide__dashboard__view",
    "add-on-dev-guide__dashboard__edit"
  ]
}
{
  "translations":{
      "permission.add-on-dev-guide":{
        "de_DE":"Developer Guide Test",
        "en_GB":"Developer Guide Test"
      },
      "permission.add-on-dev-guide__dashboard":{
        "de_DE":"Dashboard",
        "en_GB":"Dashboard"
      },
      "permission.add-on-dev-guide__dashboard__view":{
        "de_DE":"Dashboard Ansehen",
        "en_GB":"View Dashboard"
      },
      "permission.add-on-dev-guide__dashboard__edit":{
        "de_DE":"Dashboard Editieren",
        "en_GB":"Edit Dashboard"
      }
  }
}
Follow our Add-on API Guide to see how you can create translations, from your backend application.
These translations are then visible under Settings > Users management > Roles for the corresponding Add-on.
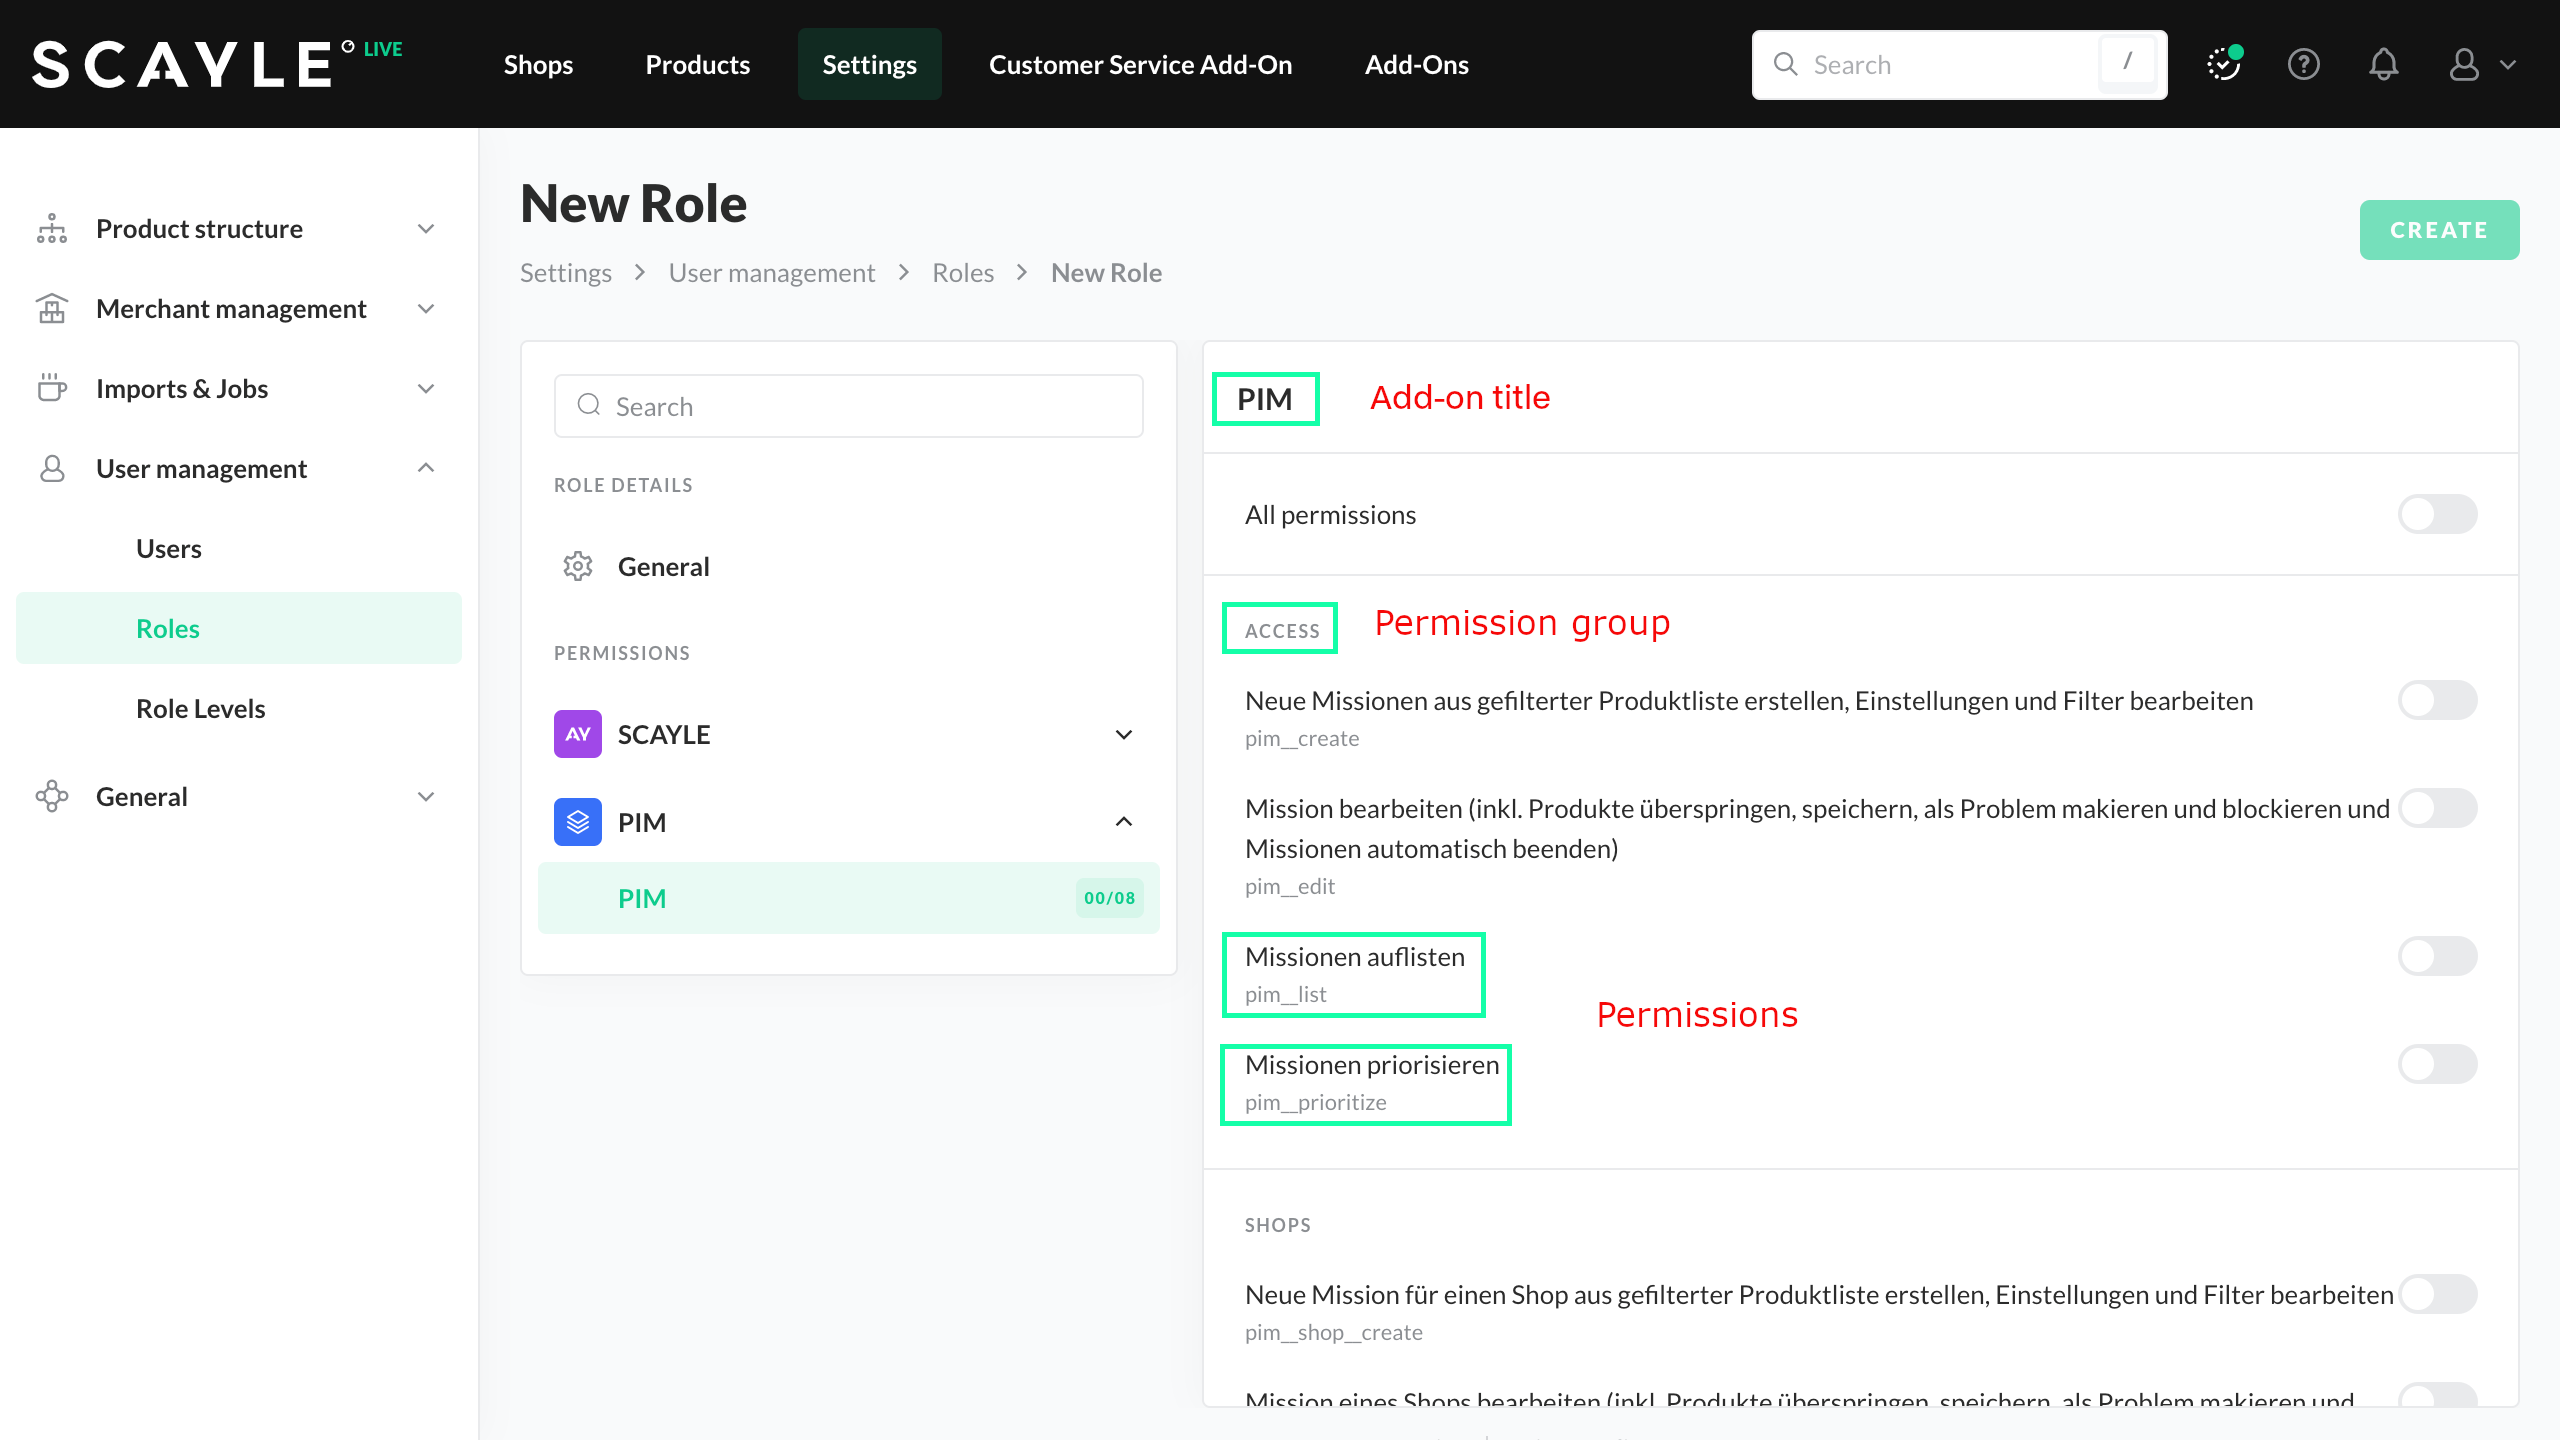
Add-on permissions with Add-on title, permission group, and permissions.
It is possible for Add-ons to receive messages when certain events happen in the panel (i.e, user updates, role updates).
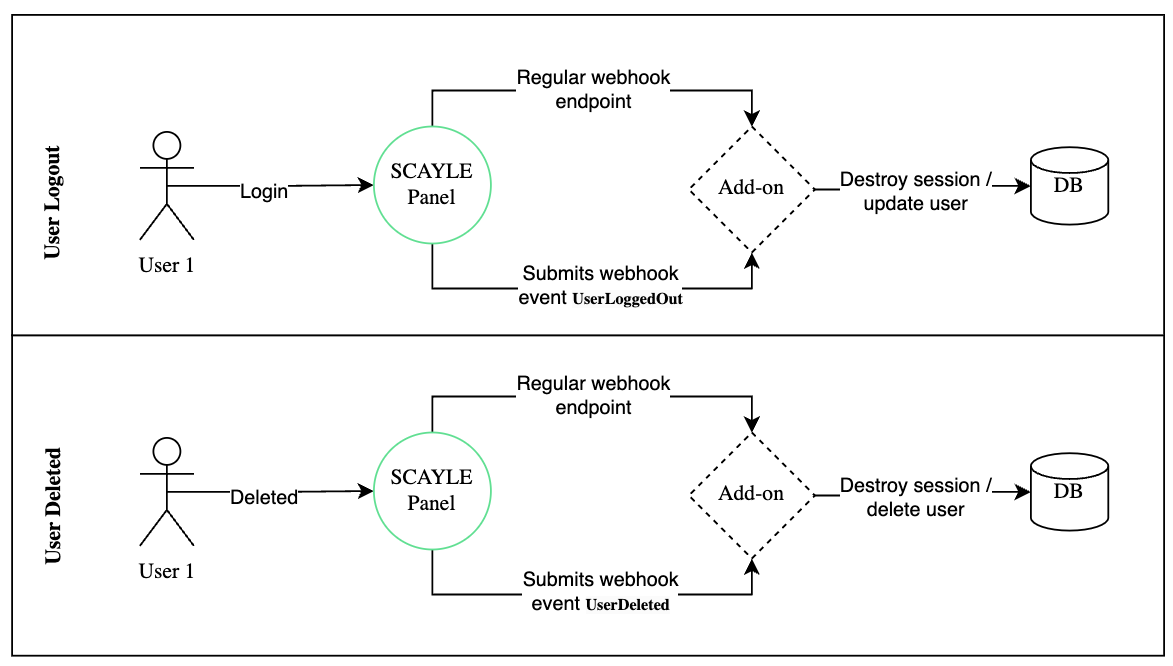
To receive these messages, two conditions need to be met:
That callback URL should accept a POST request with content type: application/json.
To increase security of incoming webhooks calls, the best option is to whitelist the domains that the calls can come from (e.g., *.scayle.cloud), or to use Basic Auth.
Message Structure
Every message sent to the callback URL will have the same structure:
| Property | Type | Notes |
|---|---|---|
| event | string | Contains the event key, which will be used by the Add-on to determine which flow should be used in any case. Dot-separated string with the following structure: {model}.{action} (e.g., user.created) |
| context | object | Contains any exposed model attribute. Its content varies from model to model, but all events related to the same entity will have the same fields. |
| id | int | ID of the entity that has been affected (i.e., the user ID for User) |
Model Definition
Every model that will post messages is defined below.
Deleted events will not contain any field in their context attribute of the message.
| Model | User |
|---|---|
| Possible events | UserCreated, UserUpdated, UserDeleted, UserLoggedOut, UserUpdatedPassword |
| Context fields | none |
| Structure example | {"id": 4, "event": "UserCreated", "context": {},} |
| Model | Role |
|---|---|
| Possible events | RoleCreated, RoleUpdated, RoleDeleted |
| Context fields | none |
| Structure example | { "id": 6, "event": "RoleUpdated", "context": {"userIds": [3,5,6]},} |
Custom data can be used to store additional data that you need directly after initialization in the SCAYLE Panel handshake. It will appear in the user property of the context object that is passed to the Add-on.
With custom data, you could configure any information on the user. For example, you could add a specific property to all users who have the role administrator.
The Notification API allows Add-on Developers to interact with the logged-in users of the SCAYLE Panel.
Follow our Add-on API Guide to see how you can create user notifications, from your backend application.
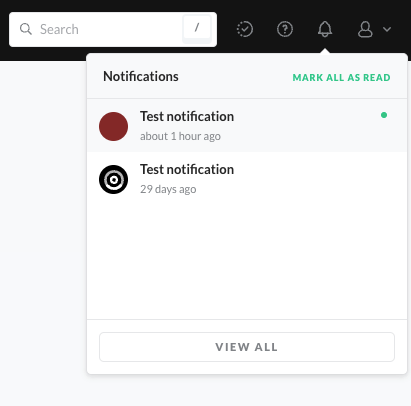
Notifications in the SCAYLE Panel.
Your first SCAYLE Add-On
Mikheil Kupatadze
Senior Frontend Developer


