

Product List
Product list allows you to:
- search for products across all shops
- apply product filters to narrow down the search result
- mass update products data type (Master categories, Attribute Groups, Status)
- export product data as a CSV file
- create missions

All Products
Search a Product List
To search the product list, navigate to Products ➜ All Products.
Each product is displayed with the following information:
- Image
- Product ID
- Name
- Style Key (also: master ID)
- Merchant
- Status
- Stock
In addition, the page lists attribute groups at the product and master level that were marked as "Show on Product List". This setting can be found in the respective attribute group in the Settings area: Settings ➜ Product Structure ➜ Attributes.
Customize a Product List
You can adjust the order and visibility of each column using the three dots in the top right corner of the product list. Click on the box of the corresponding column to add/remove it. You can reorder the columns by dragging the items. If you customize the product list, the settings will be saved only for your own account.

Order and visibility of columns on the All Products page
Product Selection
You can use the checkboxes to manually select products for update or export.

Product selection using checkboxes
Product Filters
Filters can be used to narrow down the product list. You can also combine several filters and save them. Clicking on the filter icon opens a menu where you can choose from the following filter options:
Simple Filters
Simple filters allow you to narrow down a specific selection of products. There are two different ways to filter products:
- Attribute groups
- Already available (default) criteria
Whether you can use an attribute group as a filter depends on which option was activated when the attribute group was first created (see Creating Attribute Groups). If you have the required user rights, you can add more attribute groups as filters.
The table below outlines which filter options you can choose by default.
| Filter | Description |
|---|---|
| Status | Search for one or more product statuses: Live, New, In Draft, In Approval, Problem, or Blocked. |
| In Stock | Search for available, unavailable or all products. |
| Product Bundle | Filter product list exclusively for product bundles or such that are not bundled. |
| Sale Price | Filter for products that are on sale or such that are currently sold with their full price |
| Master Category | Search for products with or without a specific category. |
| Merchants | Search for products by one or more merchants. |
All options can be combined. You can edit or delete filter settings at any time. To refine search results, add more filter options.
Note: If you choose to filter for multiple attributes in an attribute group the filters user OR-logic. So, picking About You and EDITED as merchant will render results that are either from the merchant About You OR EDITED.

All Products - simple filters
Advanced Filters
To search for products using multiple conditions you can use advanced filters to combine any number of conditions by AND or OR.
ANDchecks if all conditions are met.
Example: brand = Anybrand AND merchant = About You
- If only one of several conditions is required, you use the
ORfunction.
Example: brand = Adidas OR brand = Nike.
To check several conditions within a rule, use a group ().
Example: brand = Anybrand AND (merchant = About You OR merchant = EDITED)
Different criteria can be used for search requests. Search rules can refer to products — such as name, price, or availability — or be linked to an attribute group.
Click + to add additional rules.
In the following screenshot, all available products of the merchant "About You Outlet" and all "About You" products containing "shirt" would be displayed.

All Products - combining filter rules
Remember to pay attention to the filter rules within the criteria of an attribute group.
ID Filters
You can also filter a product list by ID searching for product ID, merchant ID, or EAN number.
| Filter | Description |
|---|---|
| Product ID | Search for one or more product IDs. |
| Merchant Identifier | Search for one or more merchant identifiers. |
| EAN | Search for one or more merchant product variant EANs. |
| Merchant Product ID | Search for one or more merchant product IDs. |
| Master ID | Search for one or more master IDs (also: style key). |
| Product Variant ID | Search for one or more product variant IDs |
The product ID refers to the shop product ID within SCAYLE. By contrast, the merchant identifier is the reference number assigned to the product by the merchant. Since the merchant identifier is not unique, SCAYLE assigns an individual merchant product ID to each merchant product during import. This allows you to find products even if they were uploaded to the system by different merchants.
The master ID, or style key, includes all products with the same core criteria, such as a shirt with different colors and sizes. The EAN is an aggregation key: a special key used for cross-merchant product identification.
Depending on the system’s configuration, there may be other individual ID filters available.
A use case would be if you need to update several products using a list of product IDs you received.

Product IDs in the filter field
Saved Filters
To save a filter set, click Save Filter. In the tab on the right, you can view, favor, or delete previously saved filter sets.
Search Results
To search the product list and display matching results, click Show Results. The selected filters are listed above the search results.
If the search does not return any matching results, you can edit the selected filters. Click on the filter symbol to open the menu and adjust the filters.
To remove individual filter criteria, click the X next to the criteria. To delete saved filters, click the delete icon.

Product filter results
The filter criteria selection is saved in the URL and can be re-accessed later by entering the same URL. You can also share the URL with other users. However, it loses its validity after 30 days if the filter was not saved.
Update products data type in a bulk
You can update product data either globally (in the Products area) or for individual shops (in the Shops area). Product data updates within a shop are only saved for that particular shop. By contrast, global updates will be automatically applied to all shops.
You can bulk update Master Category, Attribute Group and Status.
Master category updates are processed first (before potential Attribute Group updates), Status updates are processed at the very end to make sure that all automatic processes are applied correctly
You can can track the status of Product List Bulk Updates within the Background Jobs of the SCAYLE Panel.
You can only select shop-specific attribute groups in the Shops area and change them for the particular shop. Selecting shop-independent attributes, categories, and product statuses will update them globally
When you update products globally, you do not have to edit the data for all stores individually. Instead, you only modify the data once for all shops.
You can add up to 4 updates for your selected products.
A preview of bulk update is limited to 1.900.000 products.
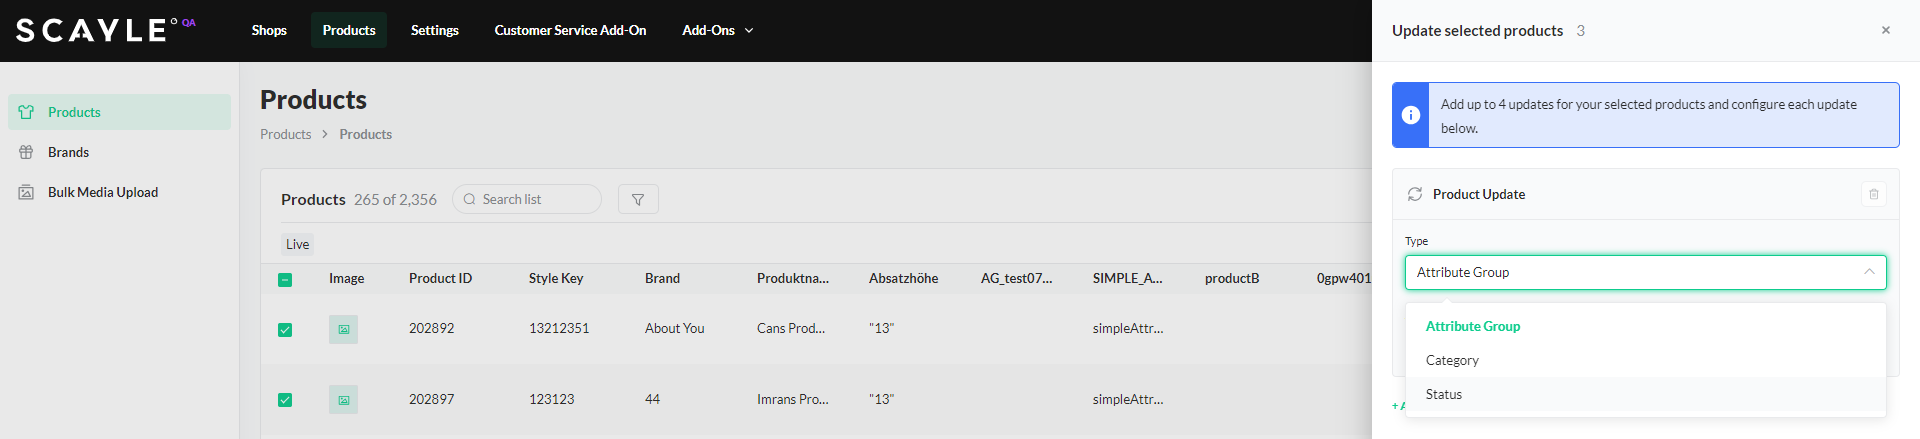
Update selected products
- In the Products tab, use filters or checkboxes to narrow down the products list.
- Click Update in the upper right corner of the product list.
- Select the update Type.
- Follow the additional steps according to which Type you selected: \
- Attribute Group
- Master Category
- Status
Update Attribute Groups
To update attribute groups:
- In the Products tab, use filters or checkboxes to narrow down the products list.
- In the Type field select Attribute Group and then the required Attribute Group from the dropdown.
- Choose Action: Replace.
A new window will open with an overview of all information to be updated. If the number of products to be updated is too large, you can download a CSV file to review all details.
Remove Attribute Groups
- In the Products tab, use filters or checkboxes to narrow down the products list.
- In the Type field select Attribute Group and then the required Attribute Group from the dropdown.
- Click Remove. A new window will open to confirm. If you delete mandatory attributes, all products that contain this attribute will be set offline automatically. The system will display a corresponding warning message.

Update attribute group
Example: Update Attribute Groups
The following example changes the current material values to "polyester". The system lists the original as well as the new values for each product. It is also possible to download information for all product IDs and target values as a CSV file. A click on Replace executes the update, and the product data is adjusted accordingly.

Update attribute example: changing all selected values to polyester
For updating advanced attribute groups, the following logic applies: Translatable attribute groups/values are updated for the default_locale that the environment is set up with. Non-translatable attribute group updates will affect all languages.
Update master category
The master category update allows you to assign a new category to all the selected products.
- Select the to apply to the products.
- In the Products tab, use filters or checkboxes to narrow down the products list.
- In the Type field select Category from the dropdown.
- Choose Action: Replace.
- A new window will open with an overview of all information to be updated.

Update category
Update Product Status
If you choose to update the product status with a mass update, some conditions must be met. For example, all mandatory attributes must have valid values before products can go live.
- In the Products tab, use filters or checkboxes to narrow down the products list.
- In the Type field select the Status to apply to the products.
- Select Status from the dropdown.
The table below provides a summary of the preconditions and effects when adjusting the product status.
| Targeted Product Status | Preconditions | Effect |
|---|---|---|
| Live | There should not be any products with automatically set problem reasons. These problem reasons set by the system cannot be overridden. | Overrides all manually entered problem reasons, products with blocked status, and drafts. |
| Draft | Products with live or blocked status will not be overridden and should not be in the product selection. | Products with the status Problem can be updated as a draft. |
| Problem | Overrides all product statuses. | |
| Blocked | Overrides all product statuses. |
Manually entered problem reasons with the status Blocked and Draft might be overridden with the status Live when executing a mass update and if no automated problem reasons exist.

Update product status
Some Important Considerations for Mass Updates
- Mass updates could be used to assign attributes to a product that are not available in its category.
- A mass update can result in mandatory attributes automatically being taken offline and removed. A part of the assortment may then no longer be sold.
- Set attributes are considered "edited". Merchants’ updates will no longer automatically modify these attributes.
- Updating several thousand products may cause the system to slow down because the product status has to be recalculated after each update.
Export product data
The export function allows you to download the current product selection as a CSV file.
- In the Products tab, use filters or checkboxes to narrow down the products list.
- Click the Export button. A selection window will open.
- Use the checkboxes to add Attribute Groups as export columns. You can only select simple Attribute Groups and basic advanced Attribute Groups
- Select a preferred Export Language.
- Click the Export button. A new window opens with the option to go to page where the export file is available for download.
The permission product__product_list__export is required to create a Product List Export. In the Export section this export will only be accessible for the user who created it.
Missions
Since refinement of product data often requires a lot of time and capacity, the SCAYLE Panel offers the Missions function to simplify this process. Missions involve creating work packages with specific criteria. You can assign these missions to one or more users who will then update the respective products.
You can create missions globally s or explicitly for individual shops.
Global Missions
Product refinements carried out globally are automatically applied to all shops. For example, you can create a global mission to update color values and replace those sent by a merchant with your own values and apply them to all shops.
Shop-Specific Missions
Shop-specific missions are useful if you want to change product data for a single shop only. An example would be if you want to flag products with an eco-certificate but only want them to be displayed in certain shops. The corresponding attribute can be maintained with a shop-specific mission for the respective products.
The PIM module
The PIM module is part of the add ons: Add-ons ➜ PIM.
You can access global missions directly from the overview. Missions for individual shops can be accessed via the drop-down menu at the top.
In both cases, there are two subareas: Overview and My Missions.
.png)
Create Missions
- Go to the product list of the respective shop: Shops ➜ [Shop Name] ➜ Products.
- Select or filter the products to be updated. Use filter options to define the scope of a mission.
- Click Create Mission.
- Complete the New Mission fields: Name, Configuration (standard or temporary), Assigned roles, and Assigned users.
- Selecting at least one of the fields Assigned roles and Assigned users is required.
- Standard missions remain permanent even if the products they contain have already been refined. Temporary missions are automatically deleted once fully processed.
There may be cases where not all mission products can always be processed immediately. In these cases, you can skip products and edit them later, as they are automatically placed at the end of a mission.
In the following example, all products of the brand "HUGO" are filtered to create a matching work package using Create Mission.
.png)
Prioritize Missions
The Overview area displays all missions with their current status. New missions are first listed in the left column with the status New. Missions that have already been prioritized appear in the right column with the status Prioritized.
Missions are displayed with their name, the number of filters used, and included products. Assigned users and the current progression of a mission are also displayed. Prioritized missions and their priority order are displayed with small blue numbers so that you can immediately see which missions have the highest priority.
Edit or delete missions
You can change the mission order with drag and drop. To edit or delete missions, mouse over a mission tile, click the three-point menu, and choose from different options.
Click on a mission tile to go to the first product details page of the products to be processed.
Make the necessary changes, and save the product. The system will automatically redirect you to the next product. This process allows you to work through missions step by step.
For more information on how product details pages are structured, see the Product Detail Page.
Create User Action Report
The Create Report function generates a user actions report. This is a CSV file containing data associated with changes made to products within the mission, such as the user role and time the change was made.
Create a report as follows:
- Go the the Overview page and click Create Report.
- Enter a role in the Select Role field.
- Enter a Timeframe for the changes.
- Select whether to include actions outside of missions.
- Click Generate Report.
The generated report can be downloaded from the Exports area under Shops ➜ [Shop] ➜ Reports ➜ Exports. It is only accessible for the user who created the report.
For more information, see the Export section.


