

Contentstack
Let editors build pages and category page content in Contentstack, preview them in the Visual Builder, and publish without a deployment. The Storefront Application V3 renders each Contentstack entry as Vue components that you own.
Why it matters
Editors work in Contentstack and your developers keep control of how every block looks.
A stack is the Contentstack project that holds your content types and entries. The Visual Builder is Contentstack's visual editor, which opens your storefront in an iframe so editors can change blocks in place. It builds on Live Preview, the Contentstack feature that lets an editor see draft changes before publishing.
What's included
- Contentstack provider package:
@scayle/storefront-cms-contentstackprovidesContentstackCMSService, the Contentstack implementation ofCMSProviderServicefrom@scayle/storefront/cms. The CMS page describes the contract. The service fetches entries from the Contentstack Delivery API, serves draft content to editor sessions, and resolves the regional API hosts. - Service binding in your storefront:
src/server/cms/providers/contentstack/service.tsbinds the package service to the TypeScript types thatpnpm cms:syncgenerates. It also validates the Contentstack environment variables when the server starts, creates the service for each request, and extracts SEO metadata from an entry ingetPageMeta. - Page and category content: Contentstack entries render the homepage at
/and/homepage, content pages at/content/:slug, and the teaser above and the SEO content below the product grid on category pages. The SEO content appears on the first page of a category only. - Block dispatch:
ContentstackBlockDispatch.vuepicks the Vue component for each block from the block's_content_type_uidfield. - Block components: Vue components for the blocks in the block table. Contentstack has no product slider block. They live in
src/client/cms/providers/contentstack/components/next to the two page-level components that render a whole page or the teaser and SEO areas of a category page. - Sanitized rich text: The rich text block converts Contentstack's JSON rich text to HTML and sanitizes it before rendering.
- Visual Builder support: The
v-live-previewdirective adds thedata-cslpattributes that the Visual Builder uses to find editable fields. TheuseContentstackEditorcomposable starts the Live Preview Utils SDK, shows the edit button on hovered fields, and reloads the page data after an editor changes content. - Content model tooling: The bundled content model in
.scayle/cms/contentModel/contentstack/can be imported into a new stack with the Storefront CLI.pnpm cms:syncexports your stack's content model back into that folder and regenerates the TypeScript types.
What you can change
Configure
- Which stack, environment, and region your storefront reads from, through environment variables.
- Whether editor sessions see draft content, with
STOREFRONT_CMS_ALLOW_DRAFTS.
Theme
- Restyle or rewrite any block component in
src/client/cms/providers/contentstack/components/. The components are Vue files in your project and use Tailwind classes.
Extend
- Add a custom content block.
- Query a different content type or URL shape.
- Add origins to the editor Content Security Policy.
- Change which entry fields feed the page title, description, robots value, and share image by editing
getPageMetainsrc/server/cms/providers/contentstack/service.ts.
Replace
- Use another CMS provider instead of Contentstack, which you select with
CMS_PROVIDERas the CMS page describes. Your Contentstack content and generated types do not carry over.
Constraints and limits
Permanent
- One server process reads from one Contentstack stack, environment, and region. The service creates its Delivery SDK client on the first published-content fetch and reuses it for every later request, so changing the stack variables needs a server restart. It does not need a rebuild.
- References between entries resolve up to five levels deep. A reference nested deeper arrives unresolved.
- The Live Preview Utils SDK reaches the browser only through the dynamic import in
useContentstackEditor, so only editor sessions download it. ThemanualChunkssetting invite.config.tsgroups the Delivery SDK into acms-contentstackchunk and leaves the Live Preview Utils SDK out on purpose. Adding it to that group would put it in a chunk that content pages load, so every customer and user would download it.
Known limitations
- The storefront decides that a request comes from an editor only by the
live_previewquery parameter. It does not check that the request came from Contentstack. Any request that carries the parameter skips shared caches, widens framing tohttps://*.contentstack.com, and receives the editor data prop with the public stack API key, environment, branch, and application host. With drafts enabled, it also fetches draft content with your preview token. - Draft content also needs
CONTENTSTACK_CMS_PREVIEW_ACCESS_TOKEN. WithoutSTOREFRONT_CMS_ALLOW_DRAFTS=true, an editor still gets Live Preview but sees published content. With the flag and no token, the first preview request throws "missing or empty preview token". - On category pages, the fetch uses the preview stack when drafts are enabled, but it does not apply the
live_previewhash and does not tag fields for editing. The Visual Builder cannot link blocks to fields there, and the fetch does not tell Contentstack which draft the editor has open. - The Live Preview Utils SDK starts in the browser after the page mounts, so edit buttons and live updates appear only once the page has hydrated. If it fails to start, the page still renders and the browser logs "Failed to initialize Contentstack Live Preview".
- The rich text block adds your Tailwind classes only to headings 1 to 3, paragraphs, lists, and links. Other nodes, such as heading 4 and below, quotes, and images added by URL, render as plain HTML without those classes. An asset embedded from the Contentstack asset library renders as an empty link, because the page request fetches no embedded items.
- The Delivery API requests do not send
CONTENTSTACK_CMS_BRANCH.pnpm cms:syncexports from that branch and the Live Preview SDK receives it, but the runtime fetch does not select a branch. - Re-running the content model import skips content types and labels that already exist, so it never updates a content type you changed in your stack. If an earlier run stopped halfway, a re-run can replace the schema of a content type that lost its reference fields.
How it works
A page request reaches a CMS page controller, which calls services.cms.fetchPageData(slug, request). The CMS page describes the controllers and the slugs they request.
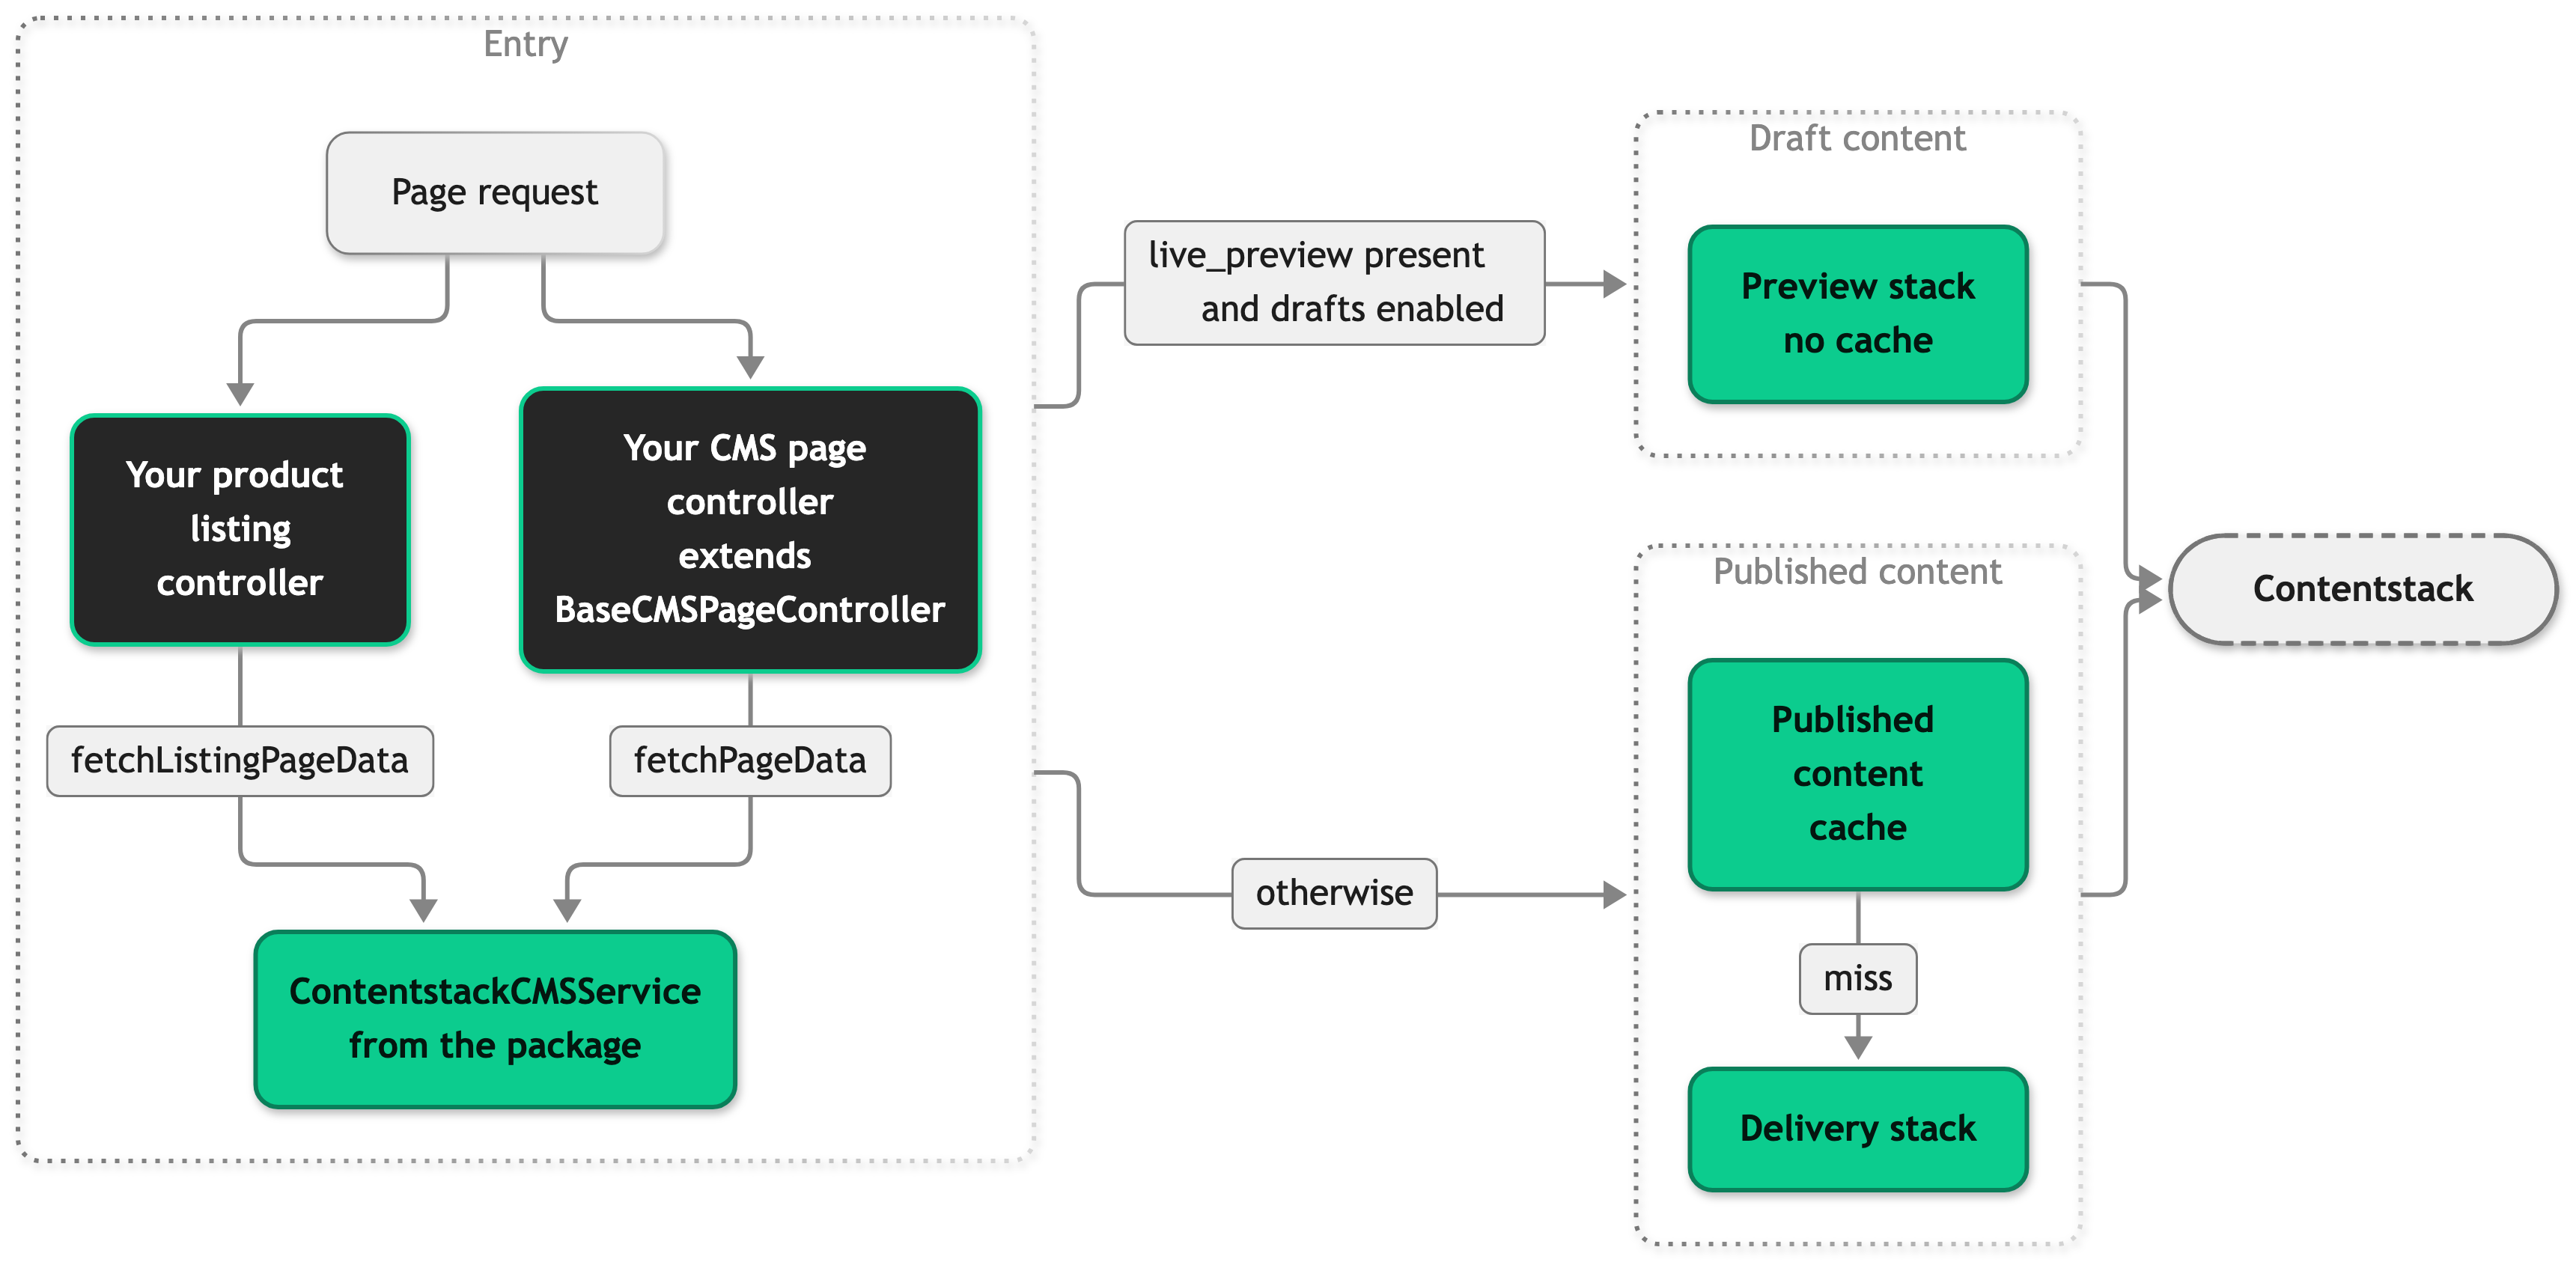
The ContentstackCMSService that your project registers is an empty subclass of the package class, so the fetching logic comes from the package.
The service reads the shop locale from the storefront context, lowercases it, and queries the page-component content type for the entry whose url field equals /<slug>. It asks Contentstack for locale fallback and resolves references up to five levels deep. It returns the entry as { entry }. The controller sends that object to the CmsPage page as the pageData prop, and PageComponent renders the entry's content blocks through ContentstackBlockDispatch.
Published content is cached per slug and locale. The CMS page says how long a change takes to show. A missing entry or a 404 from Contentstack gives the not-found page. A category page follows the same cache steps. The product listing controller calls fetchListingPageData(categoryId, request) instead of fetchPageData, and the service queries productlistingpage-component for the url value /c/c-<categoryId>.
Any other Contentstack failure, such as a network error, a timeout, or a rejected token, surfaces as an error that names the slug or category, the locale, and the content type. On a content page the error reaches the application's error handler and the customer or user sees the error page with status 500. On a category page the product listing controller logs "Unexpected CMS error on PLP" and renders the category without CMS blocks. The cache stores nothing for a failed fetch, so the next request tries again. The service sets no retry or timeout option, so the defaults of the Contentstack Delivery SDK apply: a 30 second timeout and up to five retries after a rate limit answer or a transient network error. The service creates the SDK client inside the package, so changing those defaults means patching the package.
Editor sessions
The Visual Builder loads your storefront in an iframe and adds a live_preview query parameter to the URL. On that request:
cmsCspMiddlewaremerges the Contentstack origins into each CSP header, as the CMS page describes.frame-ancestorsbecomes'self' https://*.contentstack.com, andscript-srcandconnect-srcgain Contentstack origins.- The
cmsEditorDatashared prop carries the stack API key, environment, branch, and the regional Contentstack application host. It never carries a token. - With drafts enabled, the service creates a fresh preview stack for the request and skips the cache. For a page entry it also applies the
live_previewhash and tags entry fields with editing metadata. A fresh stack per request is needed because applying the hash changes the stack's internal configuration. Category pages get the preview stack only, as the Known limitations above describes.
In the browser, v-live-preview copies the editing metadata into data-cslp attributes. After the page mounts, useContentstackEditor loads the Live Preview Utils SDK and starts it in builder mode. When an editor changes content, the SDK calls back and the composable reloads only the pageData prop through Inertia.
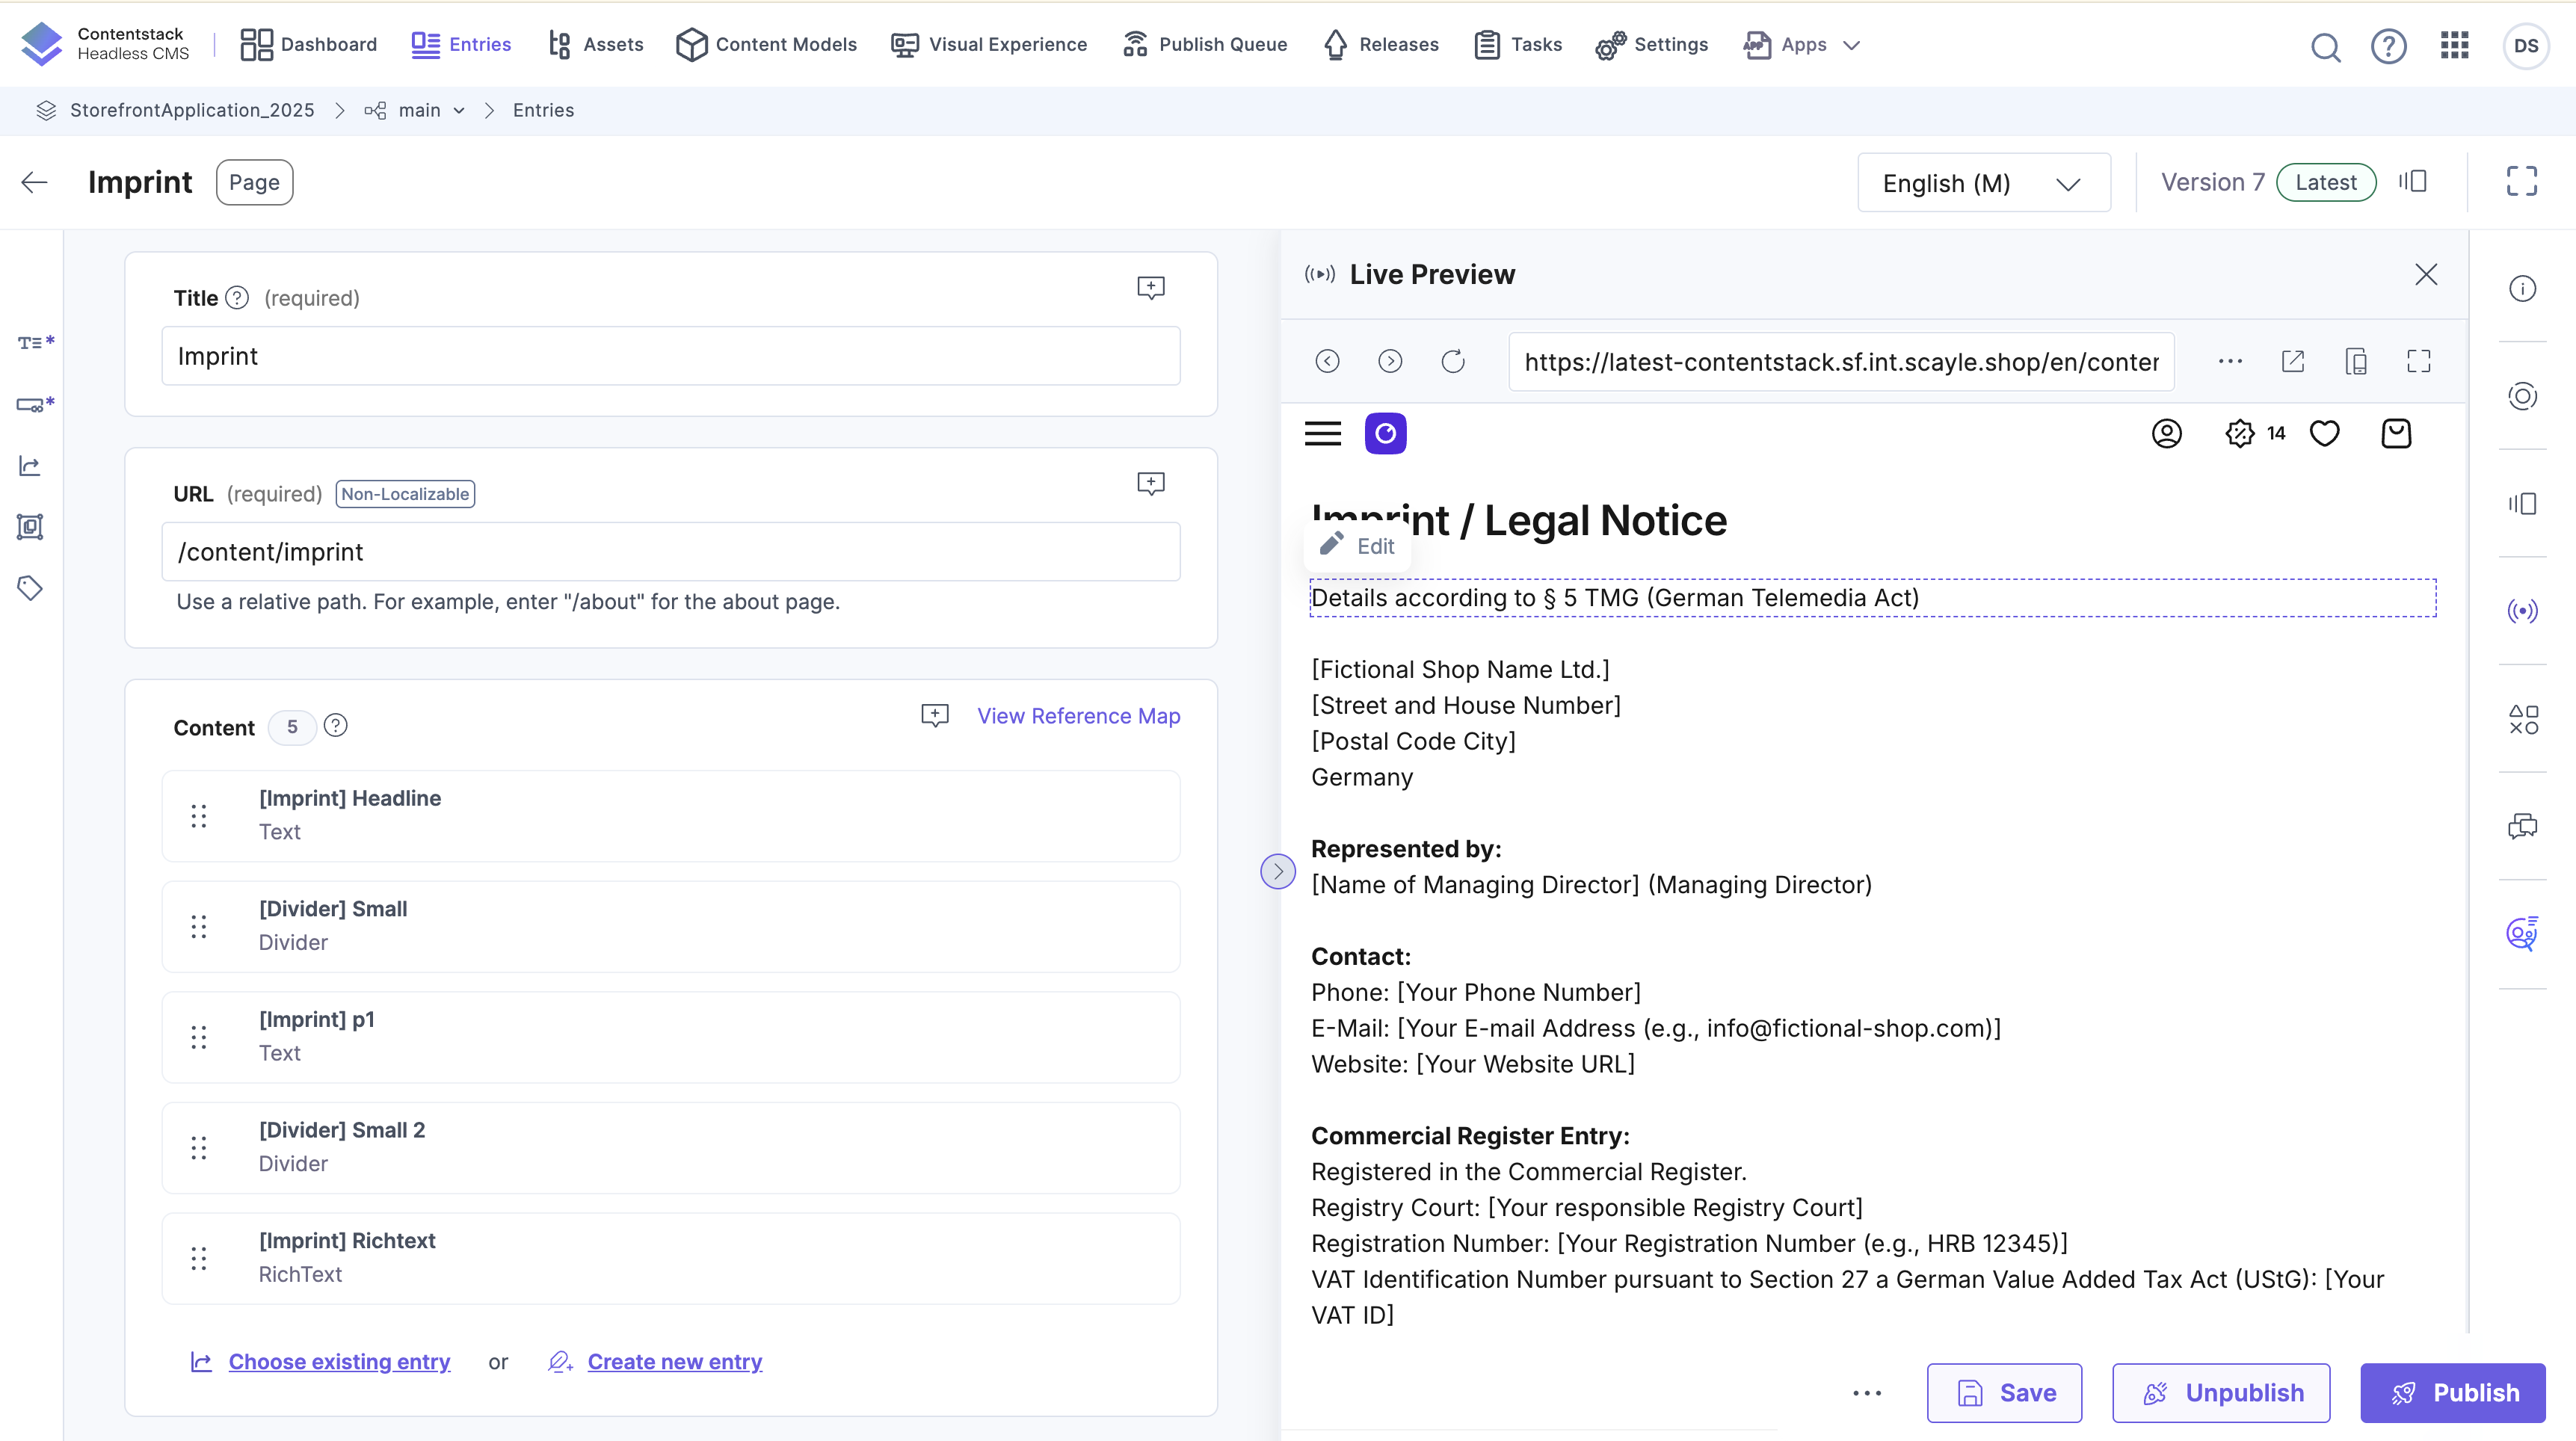
Visual builder
Setup
Set up with the Storefront CLI
You end up with the Contentstack variables in .env and, if you choose, the bundled content model imported into your stack.
Before you start, create a Contentstack stack and collect its stack API key, a delivery token, a preview token, the environment name, and the region. For the content model import you also need a management token.
- Run the command from inside your project. The CLI is a published package and your project does not depend on it, so
pnpxfetches it on demand.
The command prompts for every value it still needs. Pass flags to skip the prompts, and add--non-interactivein CI so a missing value fails the run. - Set
STOREFRONT_CMS_ALLOW_DRAFTS=truein.envif editors need draft content. - Rebuild your storefront.
CMS_PROVIDERis read at build time.
The command asks for the preview token even if you never use drafts, because the flag is required. The runtime only needs the token when a preview request arrives. The management token is required only when --import-content-model is true.
The variables the command writes are listed on the Storefront CLI page.
When it worked, the CLI prints "Environment variables updated". With the import enabled, the CLI creates your content types and labels in the stack from .scayle/cms/contentModel/contentstack/. It creates content types that hold reference fields twice. The first pass creates them without the references, because Contentstack rejects a reference to a content type that does not exist yet. The second pass adds the references once every content type exists.
Set up manually
You end up with the same .env values without the CLI. The content model import is only available through the CLI.
- Create a Contentstack stack.
- Collect the stack API key, a delivery token, a preview token if you want drafts, and the environment name. The CLI links to the delivery and preview tokens under Stack settings > Tokens, and to the environment under Stack settings > Environments.
- Choose the region of your stack from the values in the table below.
- Add the variables to
.env: - Rebuild your storefront and start it.
pnpm dev and pnpm preview read .env. pnpm start does not, so set the variables in your deployment environment for production. When it worked, a published page-component entry with the url value /homepage renders on your homepage.
Regenerate types after a content model change
You end up with TypeScript types that match your stack. Run this after every change to a content type.
Before you start, set CMS_PROVIDER=contentstack, CONTENTSTACK_CMS_STACK_API_KEY, CONTENTSTACK_CMS_MANAGEMENT_TOKEN, CONTENTSTACK_CMS_DELIVERY_TOKEN, and CONTENTSTACK_CMS_ENVIRONMENT. The command reads your .env file, and it stops when CMS_PROVIDER is not set.
- Run the sync command:
- Review and commit the changes under
.scayle/cms/contentModel/contentstack/andsrc/shared/types/cms/contentstack/gen/contentstack.d.ts.
The command only reads from your stack. It exports the content types and labels from the branch in CONTENTSTACK_CMS_BRANCH (default main), replaces the local content model folder, and runs the type generator. It stages the export first, so a failed run leaves the existing folder untouched. Each run installs the contentstack-cli-tsgen plugin for the Contentstack CLI, which generates the types. The command writes to the local Contentstack CLI settings on your machine, where it stores the region and the two tokens.
When it worked, the command prints "Contentstack sync completed successfully."
Connect the Visual Builder to your storefront
You end up with your storefront loading inside the Visual Builder.
Before you start, set STOREFRONT_CMS_ALLOW_DRAFTS=true and CONTENTSTACK_CMS_PREVIEW_ACCESS_TOKEN, then restart your storefront.
- Open your stack and go to Stack Settings.
- Under Live Preview > Visual Builder, enter your storefront's domain in the Live Preview URL field. Use a domain such as
https://mystore.example.com. - Save the settings.
When it worked, opening a page in the Visual Builder shows your storefront in the iframe and an edit button appears on hovered fields.
Configuration
Environment variables
CMS_PROVIDER and STOREFRONT_CMS_ALLOW_DRAFTS work the same for every provider. Set CMS_PROVIDER to contentstack. The CMS page describes both.
| Variable | Required | Default | A change needs | Description |
|---|---|---|---|---|
CONTENTSTACK_CMS_STACK_API_KEY | Yes | none | A server restart | Your stack API key. |
CONTENTSTACK_CMS_DELIVERY_TOKEN | Yes | none | A server restart | Delivery token, which reads published content. |
CONTENTSTACK_CMS_ENVIRONMENT | Yes | none | A server restart | Contentstack environment name, for example production. |
CONTENTSTACK_CMS_REGION | No | na | A server restart | Stack region: na, eu, au, azure-na, azure-eu, gcp-na, or gcp-eu. The aliases us, aws-na, aws-eu, and aws-au also work. An unrecognized value makes every request that creates the CMS service fail. That can be any page request, not only one for CMS content. |
CONTENTSTACK_CMS_PREVIEW_ACCESS_TOKEN | No | none | A server restart | Preview token, which reads draft content. Needed on the first preview request when drafts are enabled. |
CONTENTSTACK_CMS_BRANCH | No | none | A server restart for the Live Preview SDK, the next sync run for the export | Branch that pnpm cms:sync exports from, with main as the sync default. The Live Preview SDK receives it. |
CONTENTSTACK_CMS_MANAGEMENT_TOKEN | No | none | The next sync run | Management token for pnpm cms:sync. The runtime does not read it. |
The server checks the stack API key, delivery token, and environment when it starts. A missing or empty value stops the start with the Invalid Contentstack CMS environment message that the CMS page describes. The region is checked each time a request creates the service. A bad region therefore fails every such request, with an "invalid region" error, and not the start. Set the region to a listed value or remove it to use na.
Customization guides
Add a custom content block
You end up with a new block that editors can place on a page and that renders as your own Vue component.
Before you start, make sure your Contentstack stack, .env values, and STOREFRONT_CMS_ALLOW_DRAFTS for preview are in place.
- Create the content type in Contentstack and allow it in the
contentfield of thepage-componentcontent type, so editors can place it. - Run
pnpm cms:sync. The generated types then include your content type. - Add a component in
src/client/cms/providers/contentstack/components/. TakeDividerComponent.vueas the model. It bindsv-live-previewto the entry so the Visual Builder can find the block, and it receives the block as acontentElementprop typed from@shared/types/cms/contentstack.
The argument afterv-live-preview:names the field the element shows. Leave it out to bind the whole block. - Register the component in
ContentstackBlockDispatch.vue. Import it and add an entry to theBLOCKSmap, keyed by your content type UID exactly. Setsuspense: truewhen the component awaits insetupor is wrapped indefineAsyncComponent, andfalseotherwise. The entry forDividerComponentshows the shape:
The generated types declare_content_type_uidas a plainstring, so a mistyped key passespnpm typecheck. Import a heavy component withdefineAsyncComponent, as the file does for rich text and the product blocks, so pages without that block do not download it. A content type without an entry shows a "not implemented" line with its UID in development and test builds.
When it worked, a published entry that uses your block renders your component, and the Visual Builder highlights it.
Query a different content type or URL shape
You end up with pages that load from your own content type and URL field values instead of the defaults.
The service looks pages up in page-component by url equal to /<slug>, and category pages in productlistingpage-component by url equal to /c/c-<categoryId>. Override buildPageQuery or buildListingQuery in your subclass to change either lookup. Keep the rest of the service, because it holds the caching and preview handling.
The class is already in this file with an empty body. Add the method inside it and replace both values with yours. The entries you return must match the generated PageComponent type, because CMSPageData and getPageMeta expect that shape.
When it worked, an entry of your content type with a matching url renders at the route. If the override returns a content type with no entry, the route renders the not-found page.
Add origins to the editor Content Security Policy
You end up with extra origins allowed on editor requests, for example for fonts that your blocks load from a CDN.
cmsCspMiddleware reads cspConfig from the CMS service instance and merges its directives into the response headers of editor requests. Override the property in your subclass to add to it. The CMS page describes the merge rules. A directive the baseline already declares keeps its sources and gains yours.
The file already re-exports cspConfig from the package. That re-export does not reach the middleware, so a modified copy there has no effect.
When it worked, the Content-Security-Policy-Report-Only header of a request with live_preview includes your origin in font-src. The baseline policy enforces only frame-ancestors, so the origin reaches Content-Security-Policy only after you list fontSrc in enforcedDirectives in src/server/middleware/securityHeaders.ts.
Point a deployment at another stack or environment
You end up with one build serving a different stack, environment, or region.
One build can serve any stack, because the server reads the variables at runtime, as Constraints and limits describes. Set the variables in the environment of each deployment and restart the server. For a local run against a different stack, load an env file:
When it worked, the server serves the published content of the stack in that env file.
Best practices
Match each entry's url to its route
Set the url field to /homepage for the homepage, /content/<slug> for a content page, and /c/c-<categoryId> for a category page. The service finds entries by that field.
Turn on the priority image field for one image per page
Tell editors to turn on Priority image (LCP) for at most one image per page. Image priority explains when it is worth it.
Troubleshooting
A change published in Contentstack does not appear on the storefront
Issue: An entry you published or edited in Contentstack still shows old content or the not-found page.
Possible causes:
- The entry is not published to the environment in
CONTENTSTACK_CMS_ENVIRONMENT. - The storefront still serves the cached copy of the published content. On a cacheable route, a CDN can keep the rendered page for longer. The CMS page covers both cache times.
- The storefront reads a different stack than the one you edited, set by
CONTENTSTACK_CMS_STACK_API_KEYandCONTENTSTACK_CMS_REGION.
Solution:
- Publish the entry to the environment your storefront reads.
- Wait for the cache times to pass, then reload the page.
- Compare the stack API key, environment, and region in your deployment with the stack you edit.
Prevention: Check your changes in the Visual Builder first. Editor requests skip the response cache, and with drafts enabled they skip the application cache too.
pnpm cms:sync stops before it changes anything
Issue: The command exits with "Required variable ... is not set", "exported no content types", or "exported no labels/labels.json".
Possible causes:
- One of the four variables the sync reads is not set.
CONTENTSTACK_CMS_BRANCHnames a branch that has no content types or no labels.
Solution:
- Set the variable the message names.
- Set
CONTENTSTACK_CMS_BRANCHto a branch that holds your content types and labels. - Run
pnpm cms:syncagain.
Prevention: The command stages the export before it replaces anything, so a failed run leaves your committed content model untouched. Keep your content model on the branch you sync from.


